
First, a little bit about me. I started making my own paper piecings from coloring pages about 8 years ago. I'd already been making them from actual patterns so it was an easy transition. I even made a little bit of money selling my paper piecings on ebay. I think handcut paper piecings have become old school but I still enjoy doing them every now and then. I especially love that it gives me a unique embellishment for my scrapbook page. You're not creating something from cookie cutter die cuts. It's truly one of a kind because you created it yourself.
So...are you ready? Let's get started.
I found this image by searching google images for "Easter Bunny coloring page." (it was on page 12 for anyone who's interested!) Isn't he adorable? To use this image, right click and save it to your hard drive. Open Word, insert it as a picture, make it the size you want, then print. If you want to create a different design, go ahead and choose something else. You should still be able to follow the basic instructions in this tutorial.

Please keep in mind that paper piecings created from coloring pages are for your own personal use. Many of them are copyrighted, therefore they should not be used to create pieces you intend to sell.
Now that that's out of the way, let's gather up our supplies. To make the Easter Bunny, you'll need the following: your favorite adhesive, a glue pen, black journaling pen, a regular pencil, white cardstock, pink cardstock, sharp scissors, an ink pen, chalk, q-tips (or chalk applicator). Optional supplies are a silver journaling pen, pink flocking, tiny heart paper punch.
The more comfortable you get at creating your own paper piecings, the more you can dig into your supplies and tools to create the little details. I always use paper scraps and paper punches. Punches can be a lifesaver for small details.

Step 1: Lay the coloring page over the white cardstock, reverse side up. If you're working with textured cardstock or patterned paper, the backside should be facing up for that as well. This is so any marks that transfer onto the paper won't show on your finished piece. Now, trace around each piece of the bunny with your ink pen. Important: you need to overlap each piece so they can be attached to other pieces. Press firmly so the pen leaves an impression on your cardstock. Be sure to move the coloring page to a new spot on your cardstock for each piece. These are going to be cut out so you don't want any pieces overlapping on your cardstock.

When you're done tracing, the coloring page should look similar to this. See how I overlapped the arms and ears so I have something to attach to the head and body. I tried to photograph the impressions on my cardstock but they didn't show up so you'll have to trust me on that.

Step 2: Now it's time to cut out all your pieces. Once I'm done cutting, I like to lay the pieces over the coloring page to make sure I didn't make any mistakes.

Perfect.
Step 3: Now we're going to assemble our bunny. Flip your coloring page to the right side. Make sure your pieces are also facing right side up. You're going to work in layers, following the design on the coloring page. Position them on top of the coloring page as you glue them down. This is an easy way to make sure everything lines up correctly.


When he's all put together he'll look something like this from the back. I'm picky about my pieces being neat on the front and back.

Step 4: We're going to add the detailing now. I prefer to use a silver journaling pen on white cardstock because I think black is too harsh. However, you can use whatever you prefer. Outline each piece with a journaling pen. Keep in mind that it doesn't have to be perfect. You're just defining the edges. I rushed through mine for the tutorial. Normally I'd be a little neater about it. ;-)

Step 5: This step may be tricky if you're not good at drawing, but give it your best shot. Very lightly pencil in the bunny's face. If you don't have a tiny heart punch (mine is about 1/4" or less), you'll need to draw the nose. Once the face is to your liking, go over it with your black journaling pen, then erase any pencil lines that are showing.


Step 6: If you drew the bunny's nose skip this step. Punch a piece of pink cardstock with your heart punch. Using a glue pen, glue it in place on the face.

Step 7: We're going to add the pink on his ears and feet. This step can be done a number of ways. I used flocking to give it some texture. If you don't have flocking you can create the pieces from pink cardstock (the same way you did the rest of the bunny) or you can draw with a pink marker. To do the flocking, draw the shapes with your glue pen and sprinkle the flocking on them. Shake it off and it's done. You have to work quickly because the glue pen dries fast. (my pattern is a little distracting in the photo, sorry)


Step 8: The last detail is chalk. Rub your q-tip in pink chalk and dab his cheeks (and his nose if you drew it). 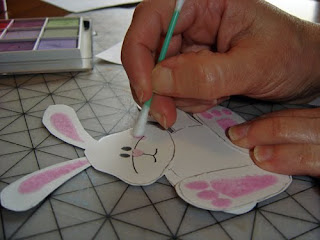

You did it! If you're ready to tackle another you can search for an Easter basket or eggs to add to the bunny piece. Have fun!

Linked on:

6 comments:
Love this bunny! Great tutorial! Thanks for sharing your talent with us! ♥
great tutorial!!! that bunny is soo sweet -- and your paper pieced version turned out wonderful!! :)
Love the bunny. You are more patient than I am....but do have me thinking of making one. Thanks and your tutorial is great. I know how time consuming that process is. Thanks again.
Aww, what a cute bunny, great tutorial
wow. you are so talented!!! great work :)
wow! Thanks for the tutorial! Another way to decorate my scrapbook! Cute bunny!
Post a Comment